Why Homeowners Need Shingle Roof Repair Knowledge
Shingle roof repair is a critical skill for homeowners, as damaged, missing, or curling shingles compromise a home’s primary defense against the elements. While some fixes are DIY-friendly, complex problems require expert help from a professional Maryland roofer to prevent costly damage.
Common shingle problems that demand attention include:
- Missing or blown-off shingles: Replace immediately to prevent water intrusion.
- Cracked or split shingles: Seal with roofing cement or replace if damage is severe.
- Curled shingle edges: Apply sealant underneath and weigh down to rebond.
- Granule loss: Replace shingles that have significant bare spots.
- Loose shingles: Re-secure with roofing nails and sealant.
A single damaged shingle is a breach in your home’s defense. Left unaddressed, it can lead to over $1,000 in water damage, turning a minor flaw into a major expense. Prompt repairs are essential to maximizing the 20-25 year lifespan of a typical asphalt shingle roof.
Weather poses a constant threat to Maryland homes. Understanding basic repair techniques empowers homeowners to address minor issues before they become major problems. For complex repairs or when safety is a concern, professional residential roofing services provide the expertise needed to protect your investment.
With nearly 50 years of experience and over 25,000 roofing projects completed, our team at Whiting Window Siding and Roofing has seen how basic shingle roof repair knowledge saves Maryland homeowners thousands in water damage costs. Educating homeowners is key to protecting their investment.

First, Spot the Problem: Identifying Shingle Damage
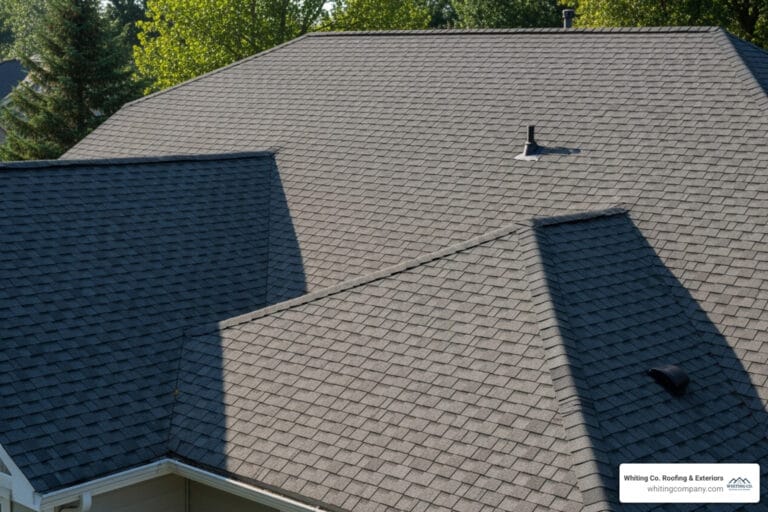
A roof inspection is a health checkup for your home. Your roof shows clear signs of distress; the key is knowing what to look for. Asphalt shingles typically last between 15 and 30 years, but Maryland’s weather can shorten that timeline.
Start from the safety of the ground. Many signs of damage are visible without a ladder:
- Granules in gutters are a key indicator. While some loss is normal on new roofs, an excessive amount means shingles are losing their UV and weather protection.
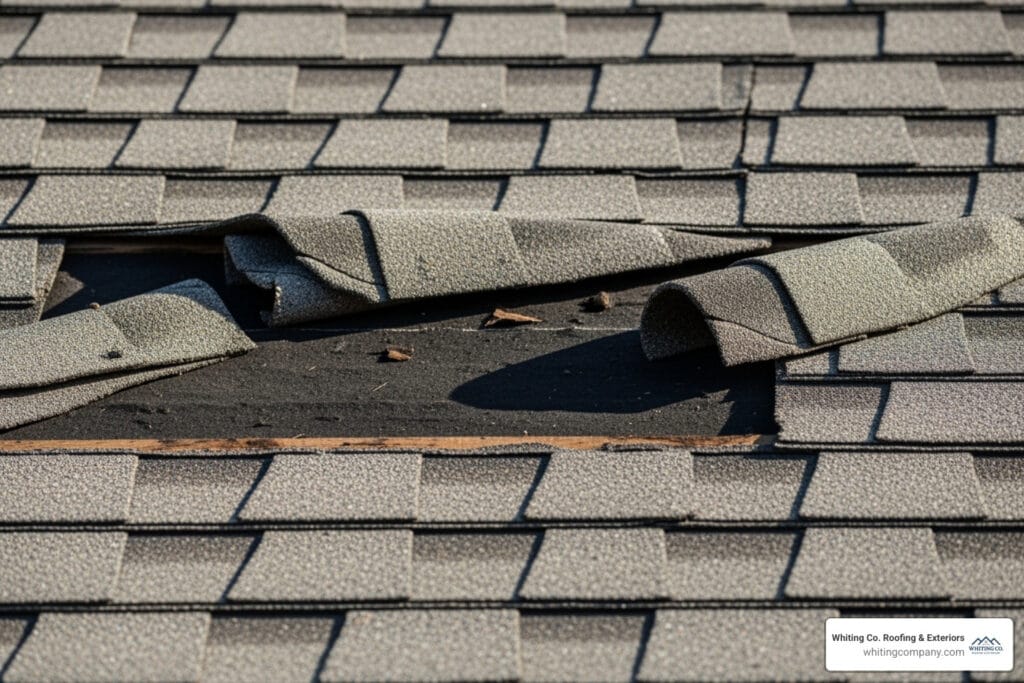
- Missing or crooked shingles create immediate entry points for water. Even a slightly askew shingle can lead to significant leaks over time.
- Dark streaks are typically algae growth. While not an emergency, this growth breaks down shingle material over time and indicates excess moisture.
- Visible cracks or curling are urgent warning signs. Curled edges lift and break seals, while cracks create direct paths for water intrusion.
Next, check your attic during daylight hours. Look for these definitive signs of a leak:
- Water stains on plywood are a clear sign of water entry.
- Damp or moldy insulation reduces energy efficiency and poses health risks.
- Daylight through roof boards indicates a direct opening that requires immediate repair.
The most common culprits behind shingle roof repair needs are blistering from trapped moisture, cracking from temperature swings, curling from age, granule loss from wear, and damage from wind or hail. Understanding these warning signs helps you catch problems early. For more on local climate challenges, see our guide on Signs Your Roof Needs Repair: A Guide for Maryland Homeowners.

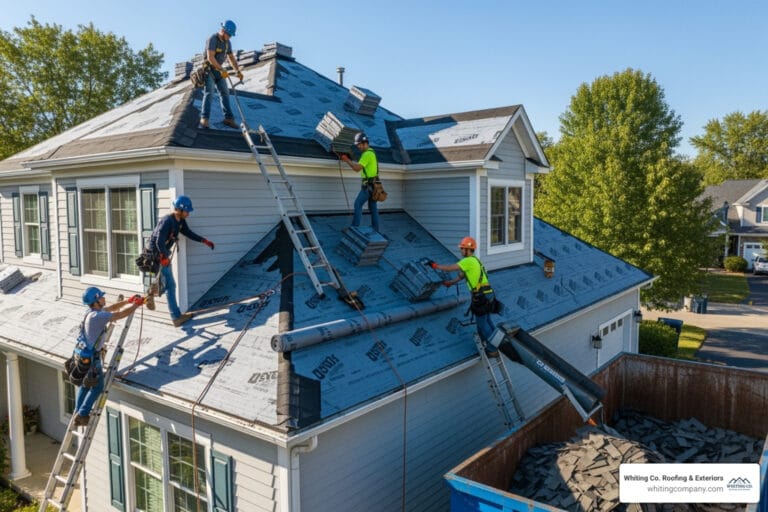
Gearing Up: Your DIY Shingle Repair Toolkit
Properly equipping yourself for shingle roof repair is the first step to a safe and successful project. Safety is non-negotiable. Over 100 Americans die from ladder accidents annually. Skipping safety basics can turn a simple repair into a hospital visit.
Safety Gear:
- Sturdy extension ladder: Set it on level ground using the 4-to-1 rule (one foot from the wall for every four feet of height).
- Safety harness: A must-have for any sloped roof, just like professional roofers use.
- Non-slip shoes: Essential for maintaining a secure grip.
- Heavy-duty gloves and safety glasses: Protect your hands and eyes from debris and sharp materials.
Tools & Materials:
- Flat pry bar: For lifting shingles without causing damage.
- Hammer and 1-1/4 inch galvanized roofing nails: The standard for securing shingles.
- Utility knife: For trimming replacement shingles to size.
- Caulking gun and trowel: For applying roofing sealant and cement.
- Replacement shingles: Match your existing shingles as closely as possible. Bring a sample to your supplier if you don’t have extras.
- Roofing sealant or cement: Use a high-quality asphalt plastic roof cement for sealing and adhesion.
A pro tip: Collect granules from your gutters. You can press them into wet sealant over crack repairs to make fixes nearly invisible.
Having the right equipment transforms a dangerous job into a manageable project. For more details on quality roofing components, explore our guide to Roofing Materials.
The Fix Is In: A Step-by-Step Guide to Shingle Roof Repair
With the right gear, you can begin the repair. Always work on a warm, dry, and calm day. The ideal temperature is between 50-85°F. In these conditions, shingles are pliable and less likely to crack, while sealants adhere properly. Cold makes shingles brittle, and extreme heat makes sealant unworkable.
How to Replace a Missing or Damaged Shingle
This fundamental shingle roof repair technique is a valuable skill for any homeowner.
- Break the Seals: Gently slide a flat pry bar under the shingle directly above the damaged one to break its seal. You may need to do this for adjacent shingles to create working room.
- Remove the Nails: Carefully lift the overlapping shingle to expose the nails in the damaged one. Use the pry bar to remove all nails securing the shingle—typically four per shingle.
- Remove the Old Shingle: Slide the old shingle out. Inspect the underlayment for damage and apply roofing cement to any tears before continuing.
- Insert the New Shingle: Slide the new shingle into place, aligning it with the surrounding shingles to maintain the roof’s water-shedding pattern.
- Nail the New Shingle: Secure the new shingle with four roofing nails. Place them just below the sealant strip of the shingle above to protect them from the elements.
- Seal the Shingles: Apply dabs of roofing cement under the tabs of the new shingle and any others you lifted. Press down firmly to reseal them against wind and water.
This systematic approach ensures your repair integrates seamlessly with your roof. For more complex scenarios, explore our professional Roof Repair services.

Quick Fixes for Minor Shingle Damage
Not every problem requires a full replacement. Roofing sealant is your best friend for these quick repairs.
- Fixing Curled Shingles: On a warm day, gently lift the curled edge and clean underneath. Apply a bead of roofing sealant, press the shingle down, and weigh it with a brick for 24 hours to ensure a strong bond.
- Fixing Cracked Shingles: Clean the area around the crack. Use a putty knife to work roofing sealant into the crack, then apply a thin layer over the top, feathering the edges. For camouflage, press loose granules from your gutters into the wet sealant.
DIY vs. Calling a Pro: When to Make the Call
Knowing when to DIY versus calling a professional for shingle roof repair is crucial for safety and preventing costly mistakes. While asphalt shingle repair is often DIY-friendly for minor issues, materials like wood shakes, clay tiles, or slate require specialized tools and expertise, as they are fragile and easily damaged by improper technique.
DIY repair is suitable for:
- A few missing or cracked shingles.
- Minor curling on a low-pitched, single-story roof.
- You are comfortable with heights and have the proper safety gear.
Call a professional when:
- The damage covers more than a 10×10 foot area.
- Your roof is steep, multi-story, or difficult to access safely.
- You see any signs of sagging or structural damage.
- The roof is over 20 years old and shows widespread wear, which may signal the need for a Roof Replacement.
- You have an active leak with an unknown source.
Water has a sneaky way of traveling, and professionals use moisture detection tools to pinpoint the actual source of a leak. For homeowners in Columbia, MD, a professional evaluation is especially valuable given our local climate challenges. Our team offers thorough Roof Inspection Services to accurately diagnose problems and recommend the most cost-effective solutions.
Sometimes the smartest DIY decision is knowing when not to. The National Roofing Contractors Association (NRCA) provides excellent resources on industry safety practices to help you make informed decisions.
Extending Your Roof’s Life: Prevention and Maintenance
The best shingle roof repair is prevention. Proactive maintenance extends your roof’s life and prevents expensive emergency repairs. A well-maintained asphalt shingle roof can exceed its 20-25 year lifespan, saving you thousands in premature replacement costs.
Proactive Roof Maintenance Checklist
- Regular Inspections: Visually inspect your roof from the ground twice a year (spring and fall) and after major storms. Use binoculars to spot missing shingles or other damage.
- Clean Gutters: Clogged gutters cause water to back up under shingles, leading to rot and dangerous winter ice dams. Regular cleaning is essential.
- Trim Trees: Keep branches trimmed at least six feet from your roofline. This prevents scraping that wears away granules and damage from falling limbs.
- Ensure Proper Attic Ventilation: Good ventilation prevents heat and moisture buildup that damages shingles from below and can cause ice dams. Poor ventilation may also void your shingle warranty.
- Address Moss and Algae: While some algae is cosmetic, heavy moss growth can lift shingles and trap moisture. Use a roof-safe cleaning solution to remove it.
Different seasons bring different challenges. Spring is ideal for checking for winter damage, while fall is the time to prepare your roof for the harsh months ahead.
By staying on top of these maintenance tasks, you protect your entire home. However, if damage is extensive or your roof is showing its age, a full Roof Replacement might be the smartest long-term investment.

Frequently Asked Questions about Shingle Roof Repair
Here are answers to the most common questions we receive about shingle roof repair.
What are the main advantages of asphalt shingles?
Asphalt shingles cover approximately 75% of U.S. homes for several key reasons:
- Cost-Effectiveness: They are significantly less expensive than materials like metal or slate.
- Versatility: They are available in a vast range of colors and styles, including designs that mimic slate or wood shakes.
- Ease of Repair: Their modular design allows for individual shingle replacement, keeping repair costs low.
- Durability: Modern asphalt shingles offer excellent resistance to wind, rain, and UV damage, with many featuring algae-resistant treatments.
Can I repair shingles in any weather?
No. Weather is a critical factor for a successful shingle roof repair. The ideal conditions are a dry, calm day with temperatures between 50°F and 85°F.
- Cold (below 45°F): Shingles become brittle and can crack when handled.
- Extreme Heat: Shingles get too soft and are easily damaged. Sealant becomes messy and difficult to apply correctly.
- Rain or Wind: These conditions are unsafe and prevent sealants from adhering properly.
What are the disadvantages of asphalt shingles?
While popular, asphalt shingles have some disadvantages:
- Shorter Lifespan: They typically last 20-25 years, which is less than metal (50+ years) or slate (100+ years).
- Environmental Impact: As petroleum-based products, their production and disposal raise environmental concerns, though shingle recycling programs are becoming more common.
- Heat Absorption: Darker shingles can increase cooling costs, although “cool roof” rated shingles are available to mitigate this effect.
- Repair Complexity: While standard 3-tab shingles are simple to fix, the complex patterns of architectural shingles can make seamless repairs more challenging.
Conclusion
Protecting your home starts with the roof. By knowing how to spot warning signs and perform basic shingle roof repair, you can prevent minor issues from becoming costly disasters. The DIY techniques covered here can add years to your roof’s life, but they require the right tools, proper weather, and a realistic assessment of your abilities.
Your safety always comes first. Recognize when a job is too big to handle. Extensive damage, steep roofs, structural issues, or hard-to-find leaks require a certified professional. Sometimes what appears to be a simple shingle problem is a symptom of a deeper issue that only a trained eye can diagnose.
For nearly 50 years, Whiting Window Siding and Roofing Roofing & Exteriors has provided Maryland homeowners with expert roofing solutions. Our local expertise means we understand how to protect your roof from Maryland’s unique climate, from summer humidity to winter ice storms.
Whether you need a targeted repair or a full replacement, our certified professionals provide honest assessments and durable solutions. If your roof needs more than a DIY fix, don’t wait for the problem to worsen. Explore our comprehensive residential roofing solutions to protect your home, your investment, and your peace of mind.