Why Proper Asphalt Shingle Roof Installation Is Critical for Your Home
Asphalt shingle roof installation is the most common roofing project in the United States, covering about 80% of residential homes. A professional roof installation protects your home from wind, rain, and extreme temperatures for 20-30 years. For code-compliant results backed by warranties, partner with a trusted roofing contractor in Maryland. Poor installation, however, can lead to leaks and structural damage within just a few years.
Quick Answer: The Essential Steps for Asphalt Shingle Roof Installation
- Prepare the roof deck: Remove old materials, repair sheathing, and clean the surface.
- Install underlayment and drip edge: Apply ice & water shield, lay underlayment, and install metal drip edge.
- Apply starter shingles: Install along eaves and rakes for wind protection.
- Lay field shingles: Work from bottom to top, staggering courses with a proper nailing pattern (4-6 nails per shingle).
- Flash penetrations: Seal around walls, vents, and valleys.
- Cap the ridge: Install ridge cap shingles to finish the peak.
This project demands precision and strict safety protocols. According to industry data, a third of construction fatalities occur from falls off roofs, making safety non-negotiable.
Your roof is a complete system, not just the visible shingles. The difference between a roof that lasts 15 years and one that lasts 30 often comes down to installation quality. Factors like roof pitch, building codes, and manufacturer specifications are critical. Even small mistakes, like improper nail placement, can void warranties and cause premature failure.
I’m Tim Whiting, owner of Whiting Window Siding and Roofing Roofing & Exteriors. With nearly 50 years of experience and over 25,000 roofing projects in Maryland, D.C., and Virginia, this guide draws from our hands-on expertise to walk you through the critical steps of an asphalt shingle roof installation.

Basic asphalt shingle roof installation vocab:
Before You Begin: Essential Planning, Tools, and Safety
Successful asphalt shingle roof installation requires careful planning, the right equipment, and an unwavering commitment to safety. A third of construction fatalities occur from falls off roofs, a sobering fact that underscores the need for proper preparation.
Essential Safety Precautions
If you are not willing to invest in proper safety equipment, you are not ready to install a roof.
- Fall Protection: A safety harness attached to a secure anchor point is your lifeline. Never step onto a roof without one.
- Ladder Safety: Use a sturdy ladder that extends at least three feet above the roofline and is tied off securely.
- Proper Gear: Wear non-slip, rubber-soled boots, work gloves, and safety glasses.
- Weather Conditions: The ideal temperature for installation is 50-80°F. Shingles won’t seal in the cold and can be damaged in extreme heat. Never work in rain, ice, or high winds.
- Work with a Partner: A partner on the ground can pass materials, spot hazards, and call for help if needed. They should also manage ground cleanup, using tarps and a magnetic sweeper for stray nails.
Tools and Materials Checklist
Gathering everything beforehand prevents dangerous mid-project trips to the store.
- Tools: Roofing nailer, hammer, utility knife, chalk line, tape measure, pry bar or roof shovel, caulk gun, and staple gun.
- Materials: Asphalt shingles, starter shingles, ridge cap shingles, underlayment (felt or synthetic), ice and water shield, drip edge, flashing, corrosion-resistant roofing nails, and roofing cement.
Choosing Your Shingles: Three-Tab vs. Architectural
Your shingle choice impacts your roof’s appearance, durability, and cost.
Three-Tab Shingles
These are the traditional, budget-friendly option, characterized by a flat, uniform appearance.
- Lifespan: 20-25 years
- Wind Rating: 60-70 mph
- Best For: Homeowners focused on lower upfront cost and a classic look.
Architectural Shingles
Also known as laminated or dimensional shingles, these are the premium choice. Their multi-layer construction creates a textured, high-end look mimicking wood shake or slate.
- Lifespan: 30-50 years
- Wind Rating: 110-130 mph
- Best For: Homeowners seeking superior durability, longevity, and curb appeal. They typically cost 20-50% more upfront but are often a better long-term investment, especially in areas with severe weather.
For a deeper dive into your options, see our Roofing Materials guide. Proper installation is more critical than the type of shingle you choose.
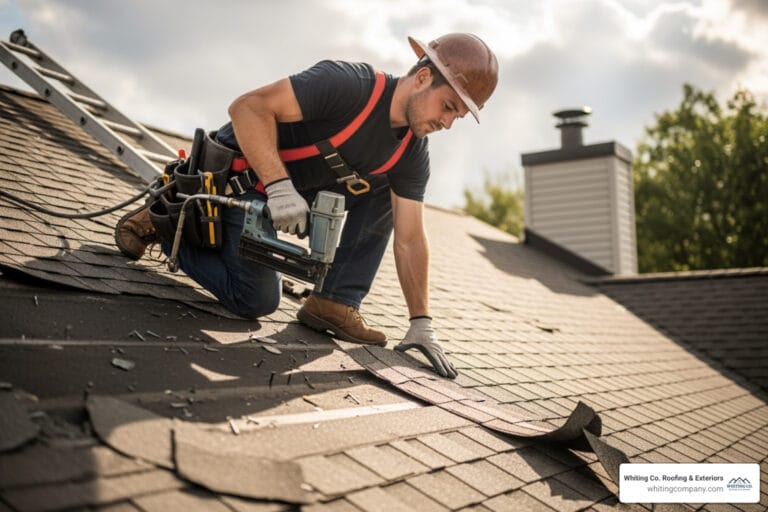
The Step-by-Step Asphalt Shingle Roof Installation Process
This is where planning meets execution. The asphalt shingle roof installation process follows a precise sequence to ensure your roof performs as designed and maintains its warranty. Adherence to manufacturer specifications and local building codes is not optional.
Step 1: Preparing the Roof Deck

A solid, clean roof deck is the foundation for a long-lasting roof. On a re-roofing project, we first tear off all old shingles, felt paper, and flashing, using tarps to protect your property.
Next, we inspect the sheathing for rot, water stains, or soft spots. Replacing damaged decking is mandatory. Any compromised sheathing is cut out and replaced with new plywood or OSB of matching thickness. We re-secure any loose deck boards to the rafters. Finally, the entire deck is swept clean of debris. For more on this phase, see our Roof Decking Replacement Guide 2025.
Step 2: Installing Underlayment and Drip Edge
The underlayment system is your roof’s secondary water barrier. We begin by applying a self-adhering ice and water shield at the most vulnerable areas: the eaves and in all valleys. This membrane seals around nails, preventing leaks from ice dams or wind-driven rain.
Next, drip edge is installed at the eaves (under the ice and water shield) to direct water into the gutters. Then, we roll out the underlayment (felt or synthetic) in horizontal courses from the bottom up, overlapping each row by at least 4 inches. Finally, drip edge is installed along the rakes (sloped gable ends) over the underlayment to secure its edge.
Step 3: Your Guide to a Proper Asphalt Shingle Roof Installation

With the foundation layers in place, it’s time for the shingles. Starter shingles are installed along the eaves and rakes with a ¼ to ¾ inch overhang. Their adhesive strip bonds to the first course of shingles, providing critical wind uplift resistance.
The first full course of shingles is laid directly over the starter strip, with the bottom edges aligned. This course is nailed according to manufacturer specifications, securing both the shingle and the starter strip beneath it.
Step 4: Nailing and Staggering Subsequent Courses
Proper nailing is the single most important factor in a roof’s wind resistance.
- Nail Count: Use 4-6 nails per shingle, with 6 being required in high-wind zones.
- Nail Placement: Nails must be placed in the manufacturer’s designated nailing zone.
- Nail Depth: Nails must be driven flush with the shingle surface—not over-driven or under-driven—and penetrate the roof deck by at least ¾ inch.
Staggering the shingle cutouts from one course to the next is essential for water shedding. We offset each course to create an interlocking pattern that prevents water from running straight down to the deck. We use chalk lines to ensure all courses are straight.
Step 5: Finishing with Ridge and Hip Caps
The final step is capping the roof’s peaks. We install field shingles up to the ridge, then install specialized ridge cap shingles. Each cap is bent over the peak and overlapped by 5-6 inches, working in a direction away from the area’s prevailing winds.
Longer nails are required to secure the caps through all underlying layers. The nail heads on the very last cap will be exposed, so we carefully seal them with roofing cement to create a permanent, watertight seal. This small detail prevents a common source of ridge leaks.
Advanced Techniques for a Watertight Finish
Properly handling penetrations and transitions is what separates an amateur job from a professional asphalt shingle roof installation. According to industry data, approximately 95% of roof leaks occur at flashing points, not in the main field of shingles. These vulnerable areas require expert attention.
How to Flash Valleys, Vents, and Chimneys
Flashing is the metal work that seals joints where the roof is interrupted.

- Walls and Chimneys: We use step flashing, weaving individual L-shaped metal pieces with each shingle course. This creates a durable, flexible seal that allows for independent movement.
- Pipe Vents: Pre-formed pipe boot flashings are used here. The boot’s flange is integrated with the shingle layers—under the shingles on the high side, over them on the low side—and sealed with roofing cement.
- Valleys: Because they channel significant water, valleys require robust protection. We recommend an open valley with a continuous metal flashing down the center. This method offers superior longevity and easier maintenance compared to closed-cut or woven valleys.
The Importance of Proper Attic Ventilation
Here’s a fact that surprises most homeowners: proper ventilation can extend your shingle life by up to 10 years. An unventilated attic gets extremely hot in the summer, cooking shingles from below, and traps moisture in the winter, leading to mold and rot.

A balanced ventilation system is essential for any professional roof installation. It creates continuous airflow using:
- Soffit vents (intake) under the eaves to draw in cool, fresh air.
- Ridge vents (exhaust) at the peak to let hot, moist air escape.
This circulation keeps the roof deck cool and dry, preventing ice dams in winter and prolonging the life of your entire roofing system. For more on this, see our Expert Insulation Tips for Maryland and Virginia Homeowners 2024.
Adjusting Your Asphalt Shingle Roof Installation for Slope and Weather
A one-size-fits-all approach doesn’t work in roofing. We adapt our techniques to the roof’s specific conditions.
- Roof Pitch: Low-slope roofs (2/12 to 4/12) require double underlayment or full ice and water shield coverage due to slow water runoff. Steep-slope roofs (above 8/12) require advanced safety equipment and techniques.
- Temperature: The ideal range is 50-80°F. Below 40°F, shingles become brittle and won’t seal without manual application of roofing cement. Above 85°F, they soften and are easily damaged.
- Wind: In high-wind zones, we use an improved nailing pattern (6 nails per shingle) as specified by FEMA guidelines and local codes to prevent shingle blow-off.
We never install shingles in the rain, as trapped moisture leads to premature failure. A professional roof replacement is done right, not rushed.
Protecting Your Investment: Maintenance and Professional Help
Once your asphalt shingle roof installation is complete, the focus shifts to preservation. Proper care is essential to maximizing your roof’s lifespan and ensuring it protects your Maryland home for decades.
How to Extend the Lifespan of Your New Roof
Consistent maintenance prevents expensive problems. Here are key tasks:
- Perform Regular Inspections: Twice a year (spring and fall) and after major storms, check for missing, cracked, or curling shingles from the ground.
- Keep Gutters Clean: Clogged gutters cause water to back up under shingles, leading to rot. Our Gutters and Gutter Installation Maryland services can help.
- Remove Debris: Gently remove leaves and branches that trap moisture against shingles.
- Check Sealant: Inspect the sealant around flashing and vents for cracks, and re-apply where needed.
- Trim Overhanging Branches: Prevent branches from scraping shingles and providing access for pests.
Our guide on Signs Your Roof Needs Repair: A Guide for Maryland Homeowners can help you spot trouble early.
DIY vs. Hiring a Professional Roofer
While this guide details the process, a DIY roof project is a serious undertaking. Before you start, consider the following:
- Safety and Heights: Roofing is dangerous work, with falls being a leading cause of construction fatalities. If you are not comfortable with heights, do not attempt it.
- Roof Complexity: A simple, low-slope garage roof may be manageable. However, roofs with a pitch above 6/12, multiple valleys, dormers, or skylights dramatically increase the difficulty and risk.
- Time and Effort: A professional crew can finish in a few days what might take a DIYer weeks. It is physically demanding labor.
- Expertise and Tools: Professionals have the experience to handle complex details like flashing and ventilation correctly. They also use specialized tools that increase efficiency and safety.
- Warranties: Many manufacturers only honor material warranties when installed by certified professionals. A professional Roof Replacement also typically includes a labor warranty for double protection.
- Codes and Permits: Professionals handle all permitting and ensure the installation meets strict local building codes, avoiding costly mistakes.
For most homeowners, especially in areas like Columbia, MD with strict codes, professional installation offers peace of mind that is worth the investment.
Conclusion
An asphalt shingle roof installation is a project where precision is paramount. The difference between a roof that lasts 30 years and one that fails in 15 lies in the details: proper nail placement, correct underlayment overlap, and watertight flashing.
We’ve covered the entire process, from preparing a solid deck to creating a balanced ventilation system. However, understanding the steps is different from executing them flawlessly. A mistake around a chimney today can become a major leak tomorrow. For homeowners in Columbia, MD, improper installation can lead to water damage, mold, and voided warranties.
At Whiting Window Siding and Roofing Roofing & Exteriors, we’ve spent nearly 50 years perfecting our craft on over 25,000 roofs. Our certified professionals understand Maryland’s climate and build roofs designed to withstand it. We handle the permits, comply with all codes, and back our work with solid warranties.
If you want to ensure your home gets the protection it deserves, a professional roof installation is the safest investment. Your roof is too important to leave to chance—let’s build something that lasts.